Expert Roof Repair: How Professionals Diagnose and Fix Common Problems
When a roof leaks, every delay or wrong fix increases cost and operational risk; expert roof repair starts with finding the root cause, not covering stains. This guide shows how professionals use visual inspection, moisture meters, infrared scans, and selective core sampling to locate problems, then match repair, waterproofing, or replacement options to real-world conditions and budgets. You will also learn what to require from a roofing contractor—certifications, written scopes, and acceptance tests—to protect warranties and minimize disruption.
1. Professional diagnostic workflow: how experts find the root cause
Key point: an expert roof repair starts by turning scattered failure signs into a single, verifiable leak path. Teams work from evidence, not assumptions, and layer inspection methods so each test either narrows the suspect area or proves it out.
Stepwise workflow professionals follow
- Preinspection: collect as-builts, warranty dates, prior repair records, roof drawings and photos so you know what system is installed and what work will void coverage.
- Site safety and access planning: confirm fall protection, roof-loading limits, and logistics for lifts or scaffolds before anyone steps on the roof.
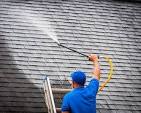
- Systematic exterior survey: walk the roof methodically (edge-to-center), document all penetrations, termination details, drains, and visible membrane distress with geo-tagged photos.
- Interior correlation: map ceiling stains, attic or deck access observations, and HVAC locations to rule out wet piping or condensation as the source.
- Non-destructive testing: use thermal imaging at the right time window, calibrated moisture meters, and drones for high-detail imagery to prioritise suspect zones.
- Targeted confirmation: perform selective core samples, flood tests, or smoke tests only where non-destructive methods point—minimize tear-out but get the evidence insurers and owners need.
- Deliverable: annotated moisture map, photo log, prioritized repair list, and acceptance tests required for sign-off.
Practical insight: timing and method choice matter. Infrared scans on low-slope roofs are most reliable pre-dawn or at night when thermal contrast is highest; daytime scans produce false positives under solar loading. Use FLIR thermography guidance as a baseline for scheduling.
Trade-off to accept: selective core sampling is destructive and costs money, but it converts suspicion into defensible fact. Skipping cores to save budget often costs more later—repeat leaks, denied insurance claims, and warranty disputes.
Concrete example: a municipal warehouse showed intermittent ceiling stains. The crew reviewed the roof record, ran a pre-dawn thermal scan to map cooler wet areas, then took three cores along the thermal gradient. Cores confirmed saturated insulation at an HVAC curb; the repair replaced the curb, reinstated metal counterflashing, and produced a moisture map tied to the invoice for the building owner. See our roof repair services for similar project workflows.
Judgment you need: if a contractor proposes a surface coating or blanket recoat before producing a moisture map and at least one core where thermal data indicates wet insulation, treat that as a red flag. In practice, coating over an active or unconfirmed wet area only delays the inevitable and can void manufacturer warranties.
Ask for an annotated moisture map, the number of cores taken, and the acceptance test (water test or thermal rescan) you will get before you pay the final invoice.

2. Common roof problems and the diagnostic signs professionals rely on
Direct point: Experienced roofing specialists see the same handful of failure modes over and over; knowing the diagnostic fingerprints saves time and prevents wasted repairs. What looks like a random leak on the ceiling usually has a repeatable cause on the roof surface or at a termination detail.
Diagnostic clues mapped to failure modes
- Flashing failures: water tracks parallel to parapets or stair-step stains at interior walls; visible gaps, failed sealant beads, or corroded counterflashing on inspection.
- Seam and lap breakdown: long, linear wet areas inside or along roof drains, membrane wrinkles, or seams that separate under hand test or show adhesive residue failures in TPO/PVC/EPDM.
- Penetrations and curbs: concentrated stains beneath HVAC units, plumbing stacks, or skylights; cracked rain collars, crushed curb corners, or loose pitch pans.
- Ponding and drainage problems: visible standing water, rapid moss growth, and accelerated seam creep where membranes were not designed for long-term ponding.
- Coating failures and blisters: patchy discoloration, flaking or soft spots in coatings that often indicate underlying moisture or poor surface prep before previous coatings.
- Storm and wind damage: torn membrane edges, popped fasteners, and missing edge metal; look for debris patterns and fastener rows pulled away from terminations.
Practical trade-off: chasing surface punctures is common but usually low value. In buildings I work on, only about one in five small leaks trace to a discrete membrane hole; most are from failed flashings or seam failures. Prioritize tests that prove the leak path – thermal scans, targeted cores, and close inspection of terminations – before authorizing patch work.
Limitations to note: some signs overlap. For example, thermal anomalies can indicate moisture, but solar loading, wet insulation deep in the roof assembly, or recent rain will skew results. Professionals combine a moisture meter read, a targeted core, and a visual check of suspect flashings to avoid false positives.
Concrete example: a retail strip center reported repeat leaks after wind events. The local roofing contractor documented torn edge metal and ran a thermal scan that highlighted seam separation along the roof edge. Crews confirmed with two small cores and repaired the terminated edge with new metal, mechanically fastened termination bar, and hot-air welded laps. After the repair, no recurrence followed the next storm season.
Look for pattern and proximity. If interior stains line up along a wall or directly beneath a curb, start at the nearest termination detail rather than random patching across the field.
3. Diagnostic tools and how to interpret their results
Direct point: diagnostic tools are evidence gatherers, not answer machines. Every instrument senses a particular property of the roof assembly and can be misleading if used alone; reliable scopes come from correlating thermography, moisture meters, visual inspection, and selective cores into a single narrative.
What each tool actually tells you (and what it doesn’t)
| Tool | Primary signal | Typical limitation / common misinterpretation |
|---|---|---|
| Infrared thermography | Surface temperature patterns that suggest retained moisture beneath the membrane | Thermal patterns can come from substrate type, shading, or recent solar loading; treat as a screening map, not proof of saturation. See FLIR thermography guidance. |
| Capacitance / resistance moisture meters | Relative moisture indicators at the surface or just below it | Readings vary by insulation type and require calibration against a dry baseline; surface moisture skews results and probes don’t reach deep saturation reliably. |
| Selective core sampling | Direct confirmation of membrane build-up, insulation condition, and actual wet insulation | Destructive; needs planning (number and location) and raises immediate repair triggers but resolves ambiguity for insurers and owners. |
| Flood and smoke testing | Locates path of water ingress around flashings, terraces, and penetrations | Works well for terrace/planter details but is impractical for large field areas and can be disruptive to occupants. |
| Drone imaging and close-up photography | High-resolution visual record of surface defects, terminations, and storm damage | Cannot assess subsurface moisture; excellent for documenting conditions and reducing risky roof walks on large commercial jobs. |
Practical insight: timing and sequencing change a tool from noisy to decisive. Run thermal scans after a long cooling period (overnight or early morning decay) and follow immediately with meter checks and targeted cores. That schedule costs more in mobilization but cuts wasted patching and prevents repeat failures.
- How to read a meter: take multiple readings across a gradient—high near flashings, low in control areas—and record absolute numbers against a dry baseline rather than relying on single spot calls.
- When to core: core where at least two different tools point (thermal hot/cold anomaly + elevated meter reading) so the destructive test has maximal diagnostic value.
- Drone advantage: use drones to find likely candidate areas for hands-on testing; do not accept drone imagery alone as acceptance evidence for repairs.
Concrete example: On a suburban medical clinic with a white TPO roof, a nighttime IR survey flagged a cool band around multiple HVAC curbs. Crews ran meter checks the next morning and then took three small cores along the band. Cores showed partial insulation saturation at curb terminations; the repair replaced curbs and re-flashed terminations rather than overlaying the field membrane—avoiding a costly, needless full-roof replacement.
Combine at least two non-destructive methods plus one selective core before approving major repairs or coating applications; insurers expect that level of evidence.
4. Repair techniques by problem type with materials and expected outcomes
Direct point: repair must address the actual failure detail, not the symptom. Patching the field membrane rarely stops leaks that originate at flashings, penetrations, or drains; matching technique to cause is the difference between a one-time fix and a recurring expense.
How professionals match technique to problem
Techniques cluster around six problem families. For each, crews choose materials that restore the original termination intent and then test the repair. That sequence – remove failed element, install manufacturer approved detail, then verify with a water test or thermal rescan – is what separates professional roof repair from temporary patches.
| Problem type | Common professional repair materials / methods | Expected performance – practical outcome | Trade-off / key consideration |
|---|---|---|---|
| Flashing corrosion or separation | New metal counterflashing, lead-free metal step flashing, mechanically fastened termination bars, butyl or silicone-compatible sealants | Durable termination restoration – medium to long-term prevention of wall-edge leaks | Metal work is costlier up-front but prevents repeat water tracking and simplifies future inspections |
| Seam splitting in TPO/PVC/EPDM | Hot-air welding for TPO/PVC, manufacturer adhesive systems for EPDM, reinforced patch membranes with tapered edges | Repaired seams return structural lap strength when installed by certified applicators | Adhesive repairs are faster but rely on compatible products and dry substrate – hot welding is more permanent on weldable membranes |
| Failed penetrations and curbs | Replace or rebuild curbs, install prefabricated curb flashings, closed-cell backer, pitch pans replaced with molded, crowned flashings | Prevents concentrated leaks under units – lowers repair frequency and improves serviceability | Rebuilding curbs requires brief rooftop access and possible HVAC disconnects – plan for coordination |
| Coating delamination or surface failure | Surface prep, primer, reinforced fabric at flashings, acrylic/silicone/polyurethane topcoat chosen for substrate | When substrate is dry and sound, coatings protect and add reflectivity – short to medium-term life extension | Coatings conceal problems if applied too soon; require documented dryness and manufacturer-approved repair of defects before application |
| Ponding and drainage defects | Install tapered insulation, reset drains and scuppers, replace clogged components, and add crickets where needed | Eliminates long-term membrane saturation and reduces seam stress | Taper work is relatively invasive but pays back by preventing accelerated membrane failure |
| Localized membrane puncture | Reinforced patch with compatible adhesive or welded tie-in, replace small field sections with proper edge termination | Quick, low-cost stopgap when no systemic issue exists | Patches fail often when near seams or under ponding – confirm location is isolated before patching |
Practical insight: the cheapest-looking option is not usually the most cost-effective. For example, adhesive patching over a seam separation on a high-wind perimeter will likely reopen; investing in mechanical termination and a welded or properly rehung lap prevents repeat claims and lowers lifetime cost.
Case example: a mid-rise apartment complex had repeated leaks along a parapet after heavy rains. The roofing crew removed old sealant, installed new metal counterflashing, reinstated the termination bar with sealant-compatible closures, and coated the parapet apron with reinforced liquid membrane. The owner avoided a field replacement and gained clear photographic evidence to satisfy the insurer and future buyers. See similar project steps at roof repair services.
Judgment call owners must make: when more than a couple of these families are involved across the roof – for example, extensive saturated insulation plus multiple failed flashings – repairs become a lower-value choice. In practice, prioritize targeted repairs when damage is confined and choose replacement when multiple system components fail or when warranty restoration requires system-level work.
Focus on restoring correct details at terminations and penetrations first. Repairs that leave termination intent or drainage unchanged are the usual cause of repeat leaks.

5. Repair versus replacement: decision criteria and cost drivers
Direct decision principle: choose repair when the failure is limited to identifiable details and the underlying roof assembly is sound; choose replacement when defects are systemic, insulation is compromised, or the existing system is near the end of its usable life. This is not a comfort call — it is an economic and risk calculation that must account for durability, warranty exposure, and operational disruption.
How to structure the decision
Condition and scope: inspect how many roof zones are affected, whether insulation or the deck is wet or delaminated, and whether multiple failure modes coexist (for example, seam failure plus flashing failure). If problems cluster around terminations only, repairs are usually cost-effective; if you find widespread insulation saturation or deck rot, replacement should move to the top of the list.
Warranty and approval risk: confirm whether repairs can be performed by a manufacturer-approved applicator without voiding coverage. A repair that saves money today but voids a remaining warranty often costs more over the next five years. Insurers and future buyers treat documented manufacturer-approved scopes and certifications as non-negotiable evidence.
Operational and indirect costs: factor in business interruption, repeated call-backs, scaffold or access costs, and energy inefficiency from wet insulation. Replacement has a higher upfront cost but reduces recurring repair logistics and often improves thermal performance — that trade-off matters for occupied buildings with high uptime value.
Primary cost drivers to quantify
- Extent of damage: localized failure versus multiple zones or whole-roof saturation
- Insulation and deck work required: insulating replacement, deck repairs, or structural remediation multiply labor and disposal costs
- Access and logistics: crane or hoist needs, rooftop equipment removal, and traffic control increase mobilization fees
- Material and system complexity: welded TPO/PVC, torch-applied modified bitumen, or specialty tile repairs each have different labor rates and lead times
- Testing and acceptance: thermal rescans, cores, and post-repair water tests add diagnostic cost but protect against repeat failures
Practical trade-off: a well-executed repair can extend service life at a fraction of replacement cost, but only when the repair restores original termination intent and stops the leak path. Temporary or cosmetic fixes that ignore insulation or deck condition are false economy and lead to repeat expenditures and insurance disputes.
Concrete example: a 15-year-old modified bitumen roof had isolated parapet flashing failures but dry insulation across the field. The roofing expert rebuilt the counterflashing, reset termination bars, and reinforced the parapet with liquid flashing; the owner gained several years of reliable service and avoided a full tear-off. By contrast, a nearby 25-year-old BUR with wide-area insulation saturation required full replacement because repeated spot repairs had failed and the deck showed signs of deterioration.
Get a side-by-side cost and disruption comparison: list repair line items with expected service life, then present replacement cost with energy and maintenance savings over the same period.
Next consideration: before authorizing work, ask your roofing contractor for a lifecycle comparison that includes downtime, warranty implications, and a simple schedule of follow-up inspections — that document changes this from an estimate into a defensible procurement decision.
6. Roof waterproofing and coatings: how they fit into an overall repair plan
Direct rule: waterproof the vulnerable details first, then protect the field with coatings when and only when the substrate is verified dry and all leak paths are fixed. Expert roof repair treats coatings as a performance layer, not a substitute for repair work at flashings, curbs, drains, and penetrations.
Waterproofing versus coatings – practical distinction
Key distinction: waterproofing fixes continuity at critical junctions using reinforced liquid membranes, sheet flashings, and metalwork; coatings are thin film systems applied over a sound membrane to add UV resistance, reflectivity, or ponding tolerance. In practice, waterproofing is detail-level, permanent work; coatings are protective and extend service life when applied to a stable, dry substrate.
Practical limitation: not all coatings suit every roof. Some coatings tolerate ponding and chemical exposure better than others, and most manufacturers publish numeric moisture limits and primer requirements. A cheap, quick coating that ignores trapped moisture or poor terminations often accelerates failure beneath the film and complicates later repairs.
Trade-off to accept: silicone systems resist ponding and last longer in wet areas but cost more up-front; acrylics are cheaper and more reflective but perform poorly under long-term standing water. Polyurethane coatings give abrasion resistance on traffic routes but require strict safety controls during application. Choose by use case, not by price.
Concrete example: a municipal rooftop plaza had leaking planters and ponding near an internal drain. Crews installed a reinforced liquid-applied membrane around the planters and curb flashings to create a continuous waterproof barrier, replaced the clogged internal drain, then applied a silicone field coating over the drained, tested areas to add UV protection and slip resistance. The sequence—detail waterproofing, drain remediation, then coating—prevented repeat leaks and simplified warranty documentation.
- What to require before any coating: a written substrate moisture report (meter logs or core confirmation) and photographic evidence of repaired flashings
- Manufacturer sign-off: proof the chosen coating is approved for the existing membrane type and for any ponding conditions; ask for the manufacturer primer and film thickness specs
- Certified applicator: documentation that the roofing contractor is a manufacturer-authorized installer for the selected system
- Acceptance tests: film thickness readings, adhesion or pull tests where applicable, and a post-application water test or thermal rescan
Judgment: coatings are often oversold as an inexpensive cure for leaks. In reality, a coating without prior targeted repairs is a temporary cosmetic fix that increases lifecycle uncertainty and may void system warranties. Treat a coating proposal without core confirmation or a clear detail-waterproofing scope as incomplete.
Do not approve a roof coating job without written moisture evidence, manufacturer pre-approval, and an explicit acceptance test to prove the repair and coating work.
Action to take: when reviewing bids, compare not just price per square foot but the diagnostic proof and acceptance testing included. Ask for the specification package and a manufacturer confirmation letter before any coating goes down.
7. Maintenance plans, contractor selection, and documentation to protect asset value
Hard truth: a roof kept on a schedule and documented wins value; a roof fixed on a price alone loses it. Owners who treat roofing as an episodic expense get surprise failures, denied claims, and lower resale bids. Planned maintenance, the right contractor selection process, and disciplined record keeping are the defenses that pay for themselves.
Maintenance plan framework
Structure a maintenance plan around three things: inspections, preventive actions, and budgeted remediation. For most low-slope commercial buildings that means two scheduled inspections per year plus an event-triggered inspection after any severe storm. High-exposure sites – coastal, heavy bird activity, or rooftop traffic – move to quarterly.
- Inspection deliverable: annotated roof drawing, photo log with geo-tags, and either meter logs or a short thermal map showing suspect areas
- Preventive tasks: clear drains and scuppers, remove debris from roof drains and gutters, reseat loose edge metals, and touch up sealants at parapets and curbs
- Budget itemization: map likely interventions to a 1, 3, and 5 year forecast so repairs are planned, not reactive
Practical trade-off: increasing inspection frequency reduces the chance of large failures but raises operating cost. Use risk-based frequency – inspect more often where roof penetration density, ponding history, or traffic is high; for low-risk warehouses, semiannual is usually sufficient.
A practical contractor selection framework
Stop comparing bids. Instead evaluate bidders across three buckets: credentials, evidence, and contract terms. Credentials are necessary but not sufficient. Evidence and contract terms separate reliable roof repair contractors from low-bid contractors who leave no trail.
- Credentials: current general liability and workers compensation insurance, local business license, and manufacturer applicator certificates for the systems in your roof; verify licenses where applicable such as a licensed roofing contractor USA registrations
- Evidence: commercial case studies or site visits, sample diagnostic report (thermal maps, meter logs, core log), and at least two customer references for similar-sized projects
- Contract terms to demand: acceptance tests (water test or thermal rescan), payment holdback until acceptance, explicit warranty language, and a clause requiring manufacturer sign-off when using branded systems
Judgment call owners must make: pay a premium for manufacturer-authorized applicators when warranties and insurance recoverability matter. In practice, certified applicators produce far fewer call-backs and back their work with both contractor and manufacturer documentation.
Documentation that protects resale and insurance claims
Keep a single project folder for the roof that includes an annotated plan, pre- and post-repair thermal maps, moisture meter logs, core photos and logs, invoices tied to line-item repairs, warranty documents, and the acceptance-test results. Store PDFs in a cloud asset system and retain records for the life of the warranty plus two years – typically 10 years total for major work.
Concrete example: A property manager accepted the low bid and received minimal documentation after repeated leaks. Claims were denied when the insurer asked for pre-repair moisture evidence. Another building owner required a pre-repair thermal scan, two selective cores, and a post-repair water test. The documented scope and acceptance tests supported a full warranty transfer when the building sold and avoided a denied claim after a storm.
Next consideration: when comparing proposals, ask each bidder to produce the exact diagnostic deliverables and acceptance tests they will provide. The cheapest line item is meaningless without the paperwork to prove the work.