Thermoplastic Roof Coatings: Cost, Benefits, and Why Commercial Owners Choose Them
Thermoplastic roof coating is a practical midlife option for commercial roofs that balances upfront cost, energy performance, and long-term weatherproofing. This guide gives facility managers and asset owners the numbers and criteria that matter: real-world cost ranges, measurable benefits such as solar reflectivity and leak reduction, installation and inspection checkpoints, and how to evaluate warranties and contractors. Expect itemized budgets, applicable standards to request, and a procurement checklist you can use on your next project.
Why Commercial Owners Choose Thermoplastic Solutions
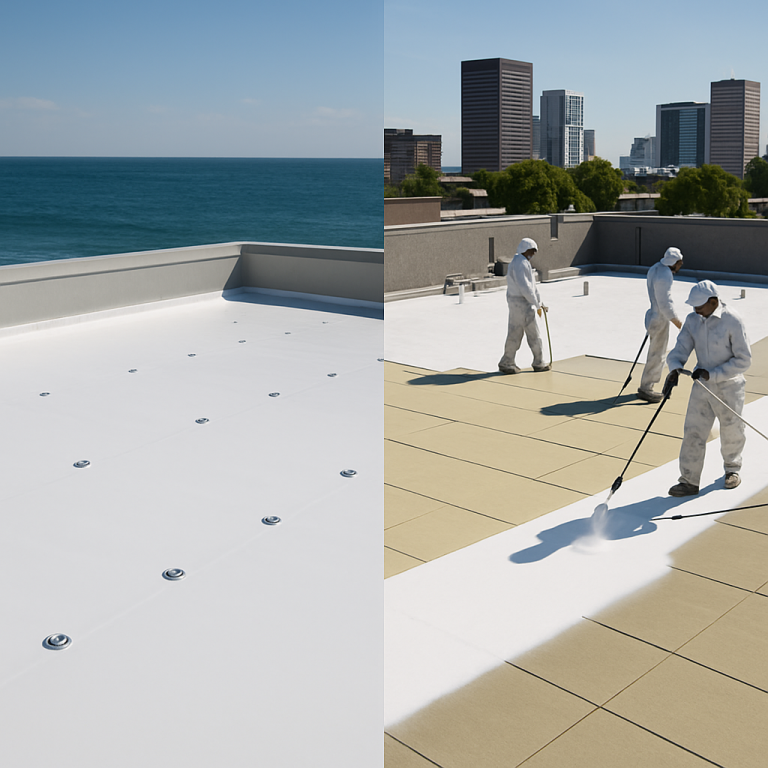
Direct payoff: lower first cost and minimal disruption. Facility teams pick a thermoplastic roof coating when the existing roof deck and membrane are fundamentally sound but beginning to show weathering, seam wear, or surface porosity. The coating restores continuity and reflectivity quickly, with far less teardown, waste, and tenant interruption than a full membrane replacement.
Practical limitation and required precondition. Coatings only perform when the substrate is appropriate; trapped moisture, delaminated insulation, or heavily oxidized single-ply often mean replacement is the right choice. Insist on a moisture survey and adhesion tests before accepting proposals. Skipping those steps is the single biggest cause of premature coating failure in practice.
Operational drivers that matter
Speed and logistics matter more than marketing claims. Thermoplastic solutions win on projects where downtime, staging, or rooftop access are constraints. A liquid thermoplastic coat can be applied in phases, allowing rooftop equipment work to continue with limited isolation zones, while TPO membrane work typically requires larger flat staging areas and more crane or forklift activity.
- Energy and code compliance: White or high albedo thermoplastic coatings support cool roof targets and local ordinances; verify CRRC listings and SRI values with the manufacturer.
- Lightweight retrofit: When structural capacity is limited, coatings add negligible dead load compared with sheet membrane layers.
- Maintenance-friendly: Coatings make future repairs simpler – local patches and periodic recoats are quicker than cutting and welding new membrane sections.
Concrete example: A 120,000 square foot warehouse with a 15 year old single-ply roof underwent localized seam repair, pressure washing, primer application, and a two-coat liquid thermoplastic system installed over two weeks. The owner avoided tenant disruption, secured a 10 year material warranty, and reduced roof surface temperatures enough to lower peak cooling loads during summer months. Project photos and scope are available from Roof Waterproofing Company for a comparable installation.
Tradeoff judgement: coatings versus full membrane replacement. Coatings reduce first cost and waste but require disciplined prep, contractor competency, and an acceptance that some failure modes – severe ponding and buried moisture – are not fixable with a coating. For high-traffic roof areas or roofs with recurring ponding, a welded thermoplastic membrane such as TPO or PVC may be more durable long term.
Market and sustainability context. The thermoplastic polyolefin market is growing, reflecting broad acceptance in commercial roofing; market analysis shows continued adoption driven by fast installations and cool roof benefits. Verify reflective values against the Cool Roof Rating Council database and compare manufacturer case studies from suppliers like Firestone when evaluating claims.
Next consideration. If you are comparing bids, prioritize verified test data and installer certification over lowest price; a correctly specified thermoplastic coating will save money and operational headaches, but a poorly tested installation becomes an expensive pause in the asset life cycle.
Cost Breakdown and Example Budgets
Upfront cost is rarely the whole decision. Break the budget into discrete line items: inspection and diagnostic testing, moisture remediation, localized membrane repairs, surface cleaning and primer, coating material, labor and equipment, mobilization and safety, warranty fees, and contingency. Each of those elements scales differently with roof size; mobilization and permitting are fixed-ish, while repairs and material quantities scale with area.
Line item assumptions used for the examples
Typical line-item notes. Inspection and moisture survey often run 0.05 to 0.20 per square foot depending on tests required. Surface repairs can be trivial or expensive – plan a repair allowance equal to 10 to 30 percent of the coating budget for roofs with seam damage or torn flashings. Warranty fees or manufacturer-required mockups usually add a fixed cost or premium on labor.
| Scenario | 5,000 sq ft (Coating / Replacement) | 20,000 sq ft (Coating / Replacement) | 100,000 sq ft (Coating / Replacement) |
|---|---|---|---|
| Low | $4,500 / $23,750 | $18,000 / $95,000 | $90,000 / $475,000 |
| Median | $8,750 / $31,250 | $35,000 / $125,000 | $175,000 / $625,000 |
| High | $15,000 / $38,750 | $60,000 / $155,000 | $300,000 / $775,000 |
What these numbers represent. Coating totals assume a practical range of per square foot installed pricing that includes cleaning, primer, two coats, and typical small repairs. Replacement totals represent a midlife thermoplastic membrane replacement with tear-off where required and standard flashings and details. Use these as directional budgets only; a moisture survey or large-scale flashing replacement materially changes line items.
- Economies of scale: Per square foot installed cost for coatings drops as roof area increases because mobilization and set up are fixed costs.
- Hidden cost driver: If adhesion testing fails or insulation is wet, expect remediation costs that often push a coating project toward replacement economics.
- Warranty premium: Expect to pay more for extended manufacturer coverage or transferable warranties; verify whether mockups and adhesion records are prerequisites.
Concrete example: A 20,000 square foot retail center with a generally intact single ply roof received a coating bid at the median column above. The scope included targeted seam repairs, pressure washing, primer, and a two-coat liquid thermoplastic application completed in four days of active work. The owner chose the coating because the roof deck and insulation tested dry and the mobilization window fit tenant schedules.
Practical tradeoff and judgment. If localized repairs exceed 20 percent of the coating budget, the lifecycle math often favors replacement. Coatings buy time and reduce disruption, but they are only cost-effective when substrate condition and adhesion tests confirm long-term compatibility. Insist on written test results and factor a realistic contingency into your procurement package.
Next consideration. When comparing bids, compare the same scope line by line and request that bidders include test results and a mockup allowance; cheapest bid on price alone is the common failure mode in coating projects. For procurement templates and certification checks, see Roof Waterproofing Company services and NRCA guidance on roof coatings.
Types of Thermoplastic Systems and Product Examples
Two practical families dominate commercial thermoplastic solutions: sheet thermoplastic membranes and liquid-applied thermoplastic systems. Sheet membranes (TPO and PVC) deliver welded seams and predictable, tested seam strength. Liquid thermoplastic coatings provide a seamless field-applied layer that depends on surface adhesion and thickness for performance.
Sheet membranes versus liquid-applied thermoplastics
Sheet thermoplastic membranes (TPO, PVC): These are factory-produced sheets installed as mechanically attached, fully adhered, or ballasted systems with seams joined by heat welding. Typical manufacturer examples are Firestone TPO, Carlisle SynTec TPO and Sika Sarnafil PVC. Strengths are seam reliability, proven wind uplift ratings, and longer service-life when seams and flashings are detailed correctly.
Liquid-applied thermoplastic coatings: These are polymer coatings applied by roller or spray that cure to form a continuous, waterproof film. Manufacturers in the coatings space include Henry Company, Mule-Hide, and Garland for systems and primers. They are best when the substrate is intact, because adhesion is the governing factor — not seam welding.
Practical limitation: Liquid coatings are not a universal fix for a failed membrane. If seams are split, flashings are torn, or insulation is wet, a coating may only mask problems temporarily. Insist on adhesion testing and a moisture survey before committing to a coating-based solution; skipping those steps is where coatings fail in practice.
| System | Typical application | Field joint method | Key trade-off |
|---|---|---|---|
| TPO / PVC sheet membrane | Full re-roof or overlay where seams and flashings need long-term mechanical strength | Heat welding (hot air) at seams | High seam reliability vs higher mobilization and tear-off costs |
| Liquid-applied thermoplastic coating | Restore continuity and reflectivity on intact single-ply or metal roofs | Adhesion to substrate; no welded seams | Fast, low-waste install vs dependence on substrate condition |
| Thermoplastic elastomer or hybrid coatings | Areas requiring flexibility and chemical resistance (equipment pads, parapets) | Adhesion with specialized primers | Better flexibility and chemical resistance vs higher material cost |
Concrete example: A 50,000 square foot municipal office with a mechanically attached single-ply TPO showed multiple localized seam splits and oxidized flashings. The project team elected a partial re-cover with new TPO sheets in high-traffic zones and a liquid thermoplastic coating for low-traffic field areas after adhesion tests confirmed compatibility. The hybrid approach minimized downtime while addressing seam failures where coating alone would not have been durable.
Judgment that matters: If your primary failure mode is seam or flashing failure, prioritize a welded thermoplastic membrane or targeted rework of flashings. Coatings are powerful for surface-level restoration and cool roof performance, but they are not a substitute for correcting structural or seam-level defects.
When evaluating proposals, require the exact product names and primer SKUs, recorded adhesion test results, and any manufacturer limitations for ponding water or previous coatings.
Next consideration: cross-check product claims against manufacturer technical datasheets and third-party databases like the NRCA guidance on roof coatings before selecting a system or accepting a warranty.
Performance Metrics and Standards to Use
Start with measurable endpoints, not marketing claims. Ask for specific, testable values that map to the hazards you need the roof to resist: solar reflectance and SRI for energy; tensile, elongation, and seam strength for mechanical durability; and peel or pull-off adhesion for substrate compatibility. Vague promises about long life are worthless without the underlying test data.
Request the standards and the supporting test reports. Insist that the supplier provide manufacturer datasheets and third-party test results to the referenced standards such as ASTM D6083 for liquid-applied coatings and ASTM D6677 where seam performance is relevant. Also require the manufacturer’s FM or UL wind uplift and ponding water approvals when those exposures exist on your roof.
Minimum documents and tests to request before award
- CRRC listing or equivalent: Provide the CRRC product ID and lifetime/aged reflectance and emissivity values (verify on the Cool Roof Rating Council site).
- Adhesion / pull-off report: A recorded test (e.g. pull-off per
ASTM D4541or documented field adhesion method) on representative roof zones and primers. - Compatibility record: Manufacturer statement confirming compatibility with the existing membrane and any prior coatings, including required primers and surface prep protocol.
- Seam and flashings approval: For sheet membranes or overlays, provide seam test reports and welding procedure specifications; for liquid systems, provide tested flashing details and primer SKUs.
- Aging or weathering data: Manufacturer or third-party accelerated weathering results and any available field-aged reflectivity data.
Practical tradeoff to understand. A coating that scores well on reflectance but fails adhesion or has poor elongation is a time bomb in regions with thermal cycling or rooftop traffic. In other words, do not let a high SRI obscure weak mechanical or adhesion performance; choose the weakest link you can tolerate and close that gap before signing a warranty.
Concrete example: A property manager required CRRC-listed aged reflectance and an on-roof pull-off test before awarding a liquid thermoplastic coating contract for a municipal building. The test revealed marginal adhesion near rooftop equipment curbs; the contractor adjusted primer selection and re-tested, which preserved warranty eligibility and avoided a premature delamination event after the first winter.
Key metric to prioritize: If your objective is energy savings and local cool-roof compliance, prioritize aged reflectance/SRI listings over initial values and get those figures in writing from the manufacturer.
What manufacturers often omit — and what you must request. Many product sheets publish initial tensile or reflectance but omit aged data, adhesion test conditions, or limitations for ponding water. Be explicit in procurement documents: require third-party data or field tests for the exact product SKU, primer, and surface condition intended on the project. If the manufacturer makes warranty coverage conditional on a mockup or specific test results, put that requirement into your contract language.
Installation Steps and Technical Considerations
Execution decides performance. A thermoplastic roof coating project is primarily a sequence of tests, repairs, and controlled applications; skip or shortcut any one step and the warranty and expected service life are at real risk.
Core installation sequence
- Survey and testing: Perform a full roof inspection, moisture survey, and representative adhesion pull-off tests. Record results and attach them to the contract.
- Targeted repairs: Replace wet insulation, resecure loose membrane, and rebuild flashings and curbs that fail mechanical or visual checks before any coating goes down.
- Cleaning and profiling: Remove dirt, oils, and biological growth. Use pressure washing and mechanical methods specified by the manufacturer to ensure consistent substrate profile.
- Primer and compatibility steps: Apply recommended primer in strict accordance with product datasheets. Do not assume one primer fits every substrate or prior coating.
- Application and thickness control: Apply coatings by the approved method – roller for details, spray for field areas – and verify wet film and dry film thickness with gauges during the run.
- Detail work and transitions: Fully dress penetrations, parapets, and drains; use welded flashings or reinforced membranes where the system requires mechanical strength at details.
- Cure and inspection: Allow manufacturer required cure time and run a final adhesion check and visual inspection before approving turnover.
- Documentation and as-built records: Deliver recorded pull-off results, mil thickness logs, product SKUs, and photographic documentation as a condition of acceptance.
Practical insight: Spray application increases daily production but raises the risk of overspray, inconsistent film build at edges, and wind driven contamination. Use a mixed method – spray the field and roll the perimeters and flashings – to get speed with control.
Technical tradeoff: Higher application temperature or faster-curing chemistries speed projects but reduce working time to feather edges and set flashings. In practice, choose the chemistry and crew size to match expected weather windows rather than chasing the fastest product.
Concrete example: A downtown hotel scheduled a coating during a shoulder season. The contractor required a one-day mockup area with recorded pull-off values and mil readings. The first mockup failed near rooftop HVAC because the wrong primer had been specified; the contractor switched to the manufacturer recommended primer, re-tested, and then completed the phased application with minimal guest disruption.
Inspection, production rates, and crew coordination
Coordination matters more than crew size. Typical commercial crews vary, but production is controlled by substrate prep and access logistics, not just how many workers you put on the roof. Plan for staging, containment of rooftop trades, and a single point of quality control on site.
Common failure points and how to avoid them: Ponding water areas, contaminated surfaces, inconsistent primer application, and poor detailing at curbs and drains are the usual culprits. Mitigate by defining acceptance criteria in the contract and requiring a mockup and recorded test results before scaling up.
Key point: require a mockup, documented adhesion results, and mil-thickness logs as preconditions for full installation. These steps are inexpensive insurance compared with premature delamination or warranty disputes.
Maintenance, Inspections, and Warranties
Maintenance determines whether a thermoplastic roof coating delivers its advertised life or becomes an expensive stopgap. Routine care is inexpensive compared with the cost and disruption of premature failures, but it must be disciplined, documented, and tied to warranty conditions to matter.
Inspection cadence and what to record
A pragmatic schedule is a visual survey twice a year plus event-driven checks after major storms, heavy snowfall, or service work on the roof. What to record matters more than how often you walk the roof. Use date-stamped photos, a short written observation (condition, exact location), and a rooftop activity log noting who worked on the roof and why.
- Daily to weekly (operational): Clear drains and remove debris around equipment to prevent ponding and mechanical abrasion.
- Biannual (proactive): Document surface condition, membrane transitions, and any soft or saturated areas using thermal imaging or moisture-sensing scans where appropriate.
- After trades or storms: Record any penetrations, tarp repairs, or traffic that could compromise details and schedule corrective work within 30 days.
Practical tradeoff: aggressive recoating schedules reduce risk but raise lifecycle cost. In many climates a light maintenance coat timed to warranty milestones is cheaper than reactive major repairs, but only if you enforce the inspection and documentation program that warranties require.
Concrete example: A midrise office owner instituted a program of quarterly drone overflights and two on-roof inspections each year. When imagery flagged accelerated wear around rooftop HVAC curbs, the owner contracted targeted reinforcement and scheduled a maintenance coat the following season, avoiding a larger warranty dispute and an emergency repair shutdown.
Insist on a documented maintenance plan in the contract. Warranties commonly require scheduled upkeep and documented repairs as a condition of coverage.
Judgment that matters: extended or transferable warranties often look attractive but are only worth the premium if the owner accepts ongoing obligations. If your operations cannot support regular inspections and timely corrective work, buy a simpler coverage or budget for a membrane replacement instead.
Next consideration: include a clause that schedules a contractor-led warranty review before the warranty midpoint and again 12 months before expiration, and require delivery of the inspection package to the owner and insurer. For templates and industry expectations see NRCA guidance and compare service offerings at Roof Waterproofing Company.
Lifecycle Economics and Case Studies Including Roof Waterproofing Company
Hard assertion: lifecycle economics are driven more by hidden failure modes and maintenance discipline than by the advertised per-square-foot price. A low installed price for a thermoplastic roof coating can look attractive on paper but quickly loses its advantage if adhesion tests fail, wet insulation is discovered, or the owner cannot sustain the inspection and maintenance regime required by the warranty.
A compact lifecycle model you can use in procurement
Model framework: represent lifecycle cost with a simple present-value equation and force bidders to populate it. Use Lifecycle Net Cost = C0 + Σ(Mt / (1+r)^t) - Σ(Et / (1+r)^t) - AvoidedRepairs - ResidualValue where C0 is first installed cost, Mt are maintenance and recoat events, Et are annual energy savings, and r is your discount rate. Insist bidders submit the assumptions behind each term.
- Inputs to require from bidders: detailed breakdown of
C0(prep, primer, repairs, labor, mobilization), an allowance and schedule for maintenance recoats, and any warranty premiums. - Verification data: recorded adhesion/pull-off results, moisture survey reports, CRRC aged reflectance or equivalent, and mockup mil-thickness logs.
- Sensitivity factors: local energy cost assumptions for
Et, expected frequency of patch repairs, and whether ponding water or rooftop traffic will increaseMtmaterially.
Practical trade-off: coatings reduce waste and embodied carbon and usually have much smaller mobilization impacts than full re-roofing. The trade-off is that coatings place a premium on accurate diagnosis and an ongoing maintenance program. If your asset team historically defers roof maintenance, replacement with a welded thermoplastic membrane may be the less risky capital decision despite higher upfront cost.
Real-world example: Roof Waterproofing Company documents projects where the procurement team required a two-stage acceptance: (1) a 100 sq ft mockup with recorded adhesion and mil readings, and (2) delivery of the full lifecycle cost worksheet before mobilization. On one municipal job the mockup revealed an incompatible primer near curbs; the contractor changed the primer, re-tested, and the corrected installation avoided an early delamination event and preserved the manufacturer warranty. Extract the full project scope and metrics from Roof Waterproofing Company roof coatings for use as a bid-template reference.
Judgment that matters: when you model lifecycle economics, do not let energy savings alone justify a coating unless the aged reflectance and realistic maintenance schedule are documented. Energy benefits are real, but they are frequently over-counted in vendor proposals because initial reflectance is used instead of aged reflectance and because expected maintenance lapses are not priced into M_t.
Build the lifecycle worksheet into the contract and verify mockup test results before releasing mobilization funds; this single step is the most effective protection against premature coating failures.
How to Select a Contractor and Procurement Checklist
Bottom line: contractor competence and documented quality control determine whether a thermoplastic roof coating is an asset or a liability. The product is secondary to execution; you must demand verifiable proof of performance before work starts and hold the contractor to measurable acceptance criteria during and after application.
What to verify up front: ask for current manufacturer installer credentials, physical project references for comparable roof types and sizes, a sample specification package showing exact product and primer SKUs, and evidence of proper insurance and bonding. If a bidder cannot produce precise technical documentation for the exact SKU they propose, treat the bid as incomplete.
Procurement checklist (minimum acceptable evidence)
| Procurement item | Minimum evidence to accept | Why this matters |
|---|---|---|
| Installer certification | Manufacturer certification ID plus listing in manufacturer directory | Confirms trained crews and warranty eligibility |
| Pilot area and test protocol | A defined trial patch with recorded adhesion and thickness readings on the actual substrate | Proves field compatibility and sets acceptance thresholds |
| Moisture/roof condition report | Written moisture survey and inspection report identifying wet insulation or delamination | Prevents coating over hidden failure modes that void performance |
| Exact product and primer SKUs | Datasheets, SDS, and CRRC or equivalent listing for the SKU used | Ensures you get the tested formulation and reflectivity claims |
| Installation QA sequence | Step-by-step application method, mil targets, cure times, and inspection checkpoints | Lets you compare bids on the same technical basis |
| Warranty draft | Material and workmanship warranty text showing terms, exclusions, and maintenance obligations | Reveals conditional clauses that affect long-term protection |
| Proof of insurance | Certificate of insurance with contractor and owner additional insured and limits shown | Protects against on-site losses and contractor failure |
Practical trade-off: low bids often omit the expensive but essential items above or substitute inferior primers. Paying more for a bidder who provides a complete technical package and a trial patch usually saves money and warranty headaches later.
Concrete example: a facilities team running a procurement for a 40,000 square foot retail roof required a trial area with recorded adhesion and mil-log data before mobilization. The apparent low-cost bidder failed the trial due to an incompatible primer; the accepted bidder adjusted materials, re-tested, and completed the project without delamination or early warranty claims.
Red flags to stop the process: vague descriptions of surface prep instead of a defined protocol, missing primer SKUs, refusal to perform a trial patch, or warranty drafts that shift maintenance obligations entirely to the owner. These are signs the contractor is outsourcing risk to you.
Next step: issue your bid as a technical package — attach the lifecycle worksheet you will use to evaluate proposals, require the trial area protocol, and include links to reference standards such as NRCA roof coatings guidance and a local installer portfolio such as Roof Waterproofing Company roof coatings.
Frequently Asked Questions
Direct answer up front: the decisions that wreck thermoplastic roof coating projects are avoidable and almost always trace back to inadequate testing, unclear acceptance criteria, or a warranty that shifts maintenance risk to the owner. This FAQ focuses on the practical clarifications facility teams actually need to close those gaps.
What substrate checks are non-negotiable before a coating is approved?
Minimum tests to require: a moisture survey that identifies wet insulation or delamination, and recorded pull-off adhesion tests on representative zones and primers. Ask for the raw test results attached to the contract and a remediation plan tied to specific thresholds rather than vague language.
Will a thermoplastic coating stand up to ponding water?
Short answer: not always. Some thermoplastic coatings are formulated for intermittent ponding, others explicitly exclude it. If ponding exists, demand manufacturer confirmation for that SKU and primer under the roof conditions you recorded, and include it as a pass/fail in the mockup protocol.
How do warranties interact with routine maintenance?
Important nuance: many warranties require documented maintenance at set intervals as a condition of coverage. If your operations cannot guarantee inspections and prompt repairs, an extended warranty is often wasted money. Require the draft warranty in bids and map out who does what, when, and how evidence will be recorded.
Can you recoat or layer thermoplastic systems later?
Practical reality: most thermoplastic coatings can accept future recoats, but only if the surface was prepared and primed as specified and you have mil-thickness records. Plan recoats into the lifecycle model and enforce mil logs during the first installation to avoid adhesion surprises on subsequent coats.
What common mistake voids claims or triggers early failure?
What I see in the field: owners accept bids without a trial patch and recorded tests. That one omission turns warranty disputes into expensive litigation or rework. Insist on a trial patch before mobilization and make recorded mil and pull-off numbers a release condition for payment.
Concrete example: A neighborhood grocery installed a white liquid thermoplastic coat over an aged built-up roof without a moisture scan. After heavy rains the coating delaminated around roof drains; the manufacturer denied a full warranty because no pull-off records existed. The owner paid for localized tear-out and a proper re-cover instead of a simple repair.
Next actions you can implement immediately: (1) Add a mockup and adhesion-test clause to your bid package and reference NRCA guidance for test methods; (2) Require bidders to submit the draft warranty and maintenance schedule with their price; (3) Hold 10 to 15 percent of final payment until the completion package with mil logs, pull-off results, and photos is delivered. Implementing these three items changes outcomes materially.